At the beginning of the workshops (1 and 2 mainly) I was so stressed with trying to keep up and take everything in that I didn't cope too well! I remember having very small panic attacks when I got a little behind and I felt kinda scared inside or breathless at times, which seems kind of silly sounding...I guess I'm just an anxious person when it comes to some things! However in the last few workshops I felt a lot better, and after working on some improved versions of the models at home I slowly became more confident with using Maya. I also think these models were a lot better designed, but this was probably because I was a lot more calm and collected and had more time to think ideas over and experiment! I actually had a lot of fun doing this. I really enjoyed using Sculptris as well - it was a bit less restrictive with sculpting etc and I found it fun to play around with what I could manipulate in it. Overall my designs could have been better, but after feeling so unconfident with it all from the beginning, I think I've improved a lot and I'm kind of proud of myself for sticking with it and trying really hard to better myself. I think my favourite of the models would probably have to be either my meteors or the potatoes.  I think the meteors just turned out looking most realistic out of my models and the potatoes were a lot better because these were the final things I did in Maya and therefore I had had the most practice. 


I kind of liked my UFO as well, but mainly for the colours and design part. I found the modelling of it in class quite hard, but re-did it at home to create the final model which I feel is a lot better. I didn't want it to be just a standard / typical UFO design and one day while modelling it and listening to a Disney soundtrack and Randy Newman I thought I'd base the design off of the Toy Story universe with lots of bright colours etc. I even put a little alien in to finish off the look!


My least favourite models were probably the spaceship and the moon. I wasn't sure of a good design for the spaceship so I finally settled on one that I didn't particularly like but thought was a lot better than any other ones. If I had more time and less work I would love to play around with this more until I'm totally happy with this. As for the moon I just didn't like the general turn out of it - both the model and design. I couldn't really find a texture that fit it properly and it just looks odd. I would love to go back to this when I have more free time and maybe sculpt and design another one to see if I could do a better job.


Overall Reflection

While I don't think I'm going to be a 3D modeller or animator any time soon, I would love to play around more with Maya and Sculptris with more 3d objects. Especially when I have a lot more free time. I'm sure during summer I will be coming back to see what more I can do! I've learnt I do find it fun, but only going at my own pace where I can take time to think things through and take in all the new information! Retaining everything in class was one of the most challenging parts for me, but I feel I overcame this by working at home a bit more of everything. This is something I wouldn't have really pictured myself doing, never mind a good job at, and I'm really glad to have had this head start at it! It means that I now have the opportunity and the interest to further my knowledge in this area which I find really exciting. I think the more I practise the more I'll improve so that's where I'm leaving it for now. I'm very excited to see where I'll go in the future as a hobby with it. 


I was runner for Tom, Lucy and Shahid's group for their dance film "Parallel." At the beginning of the day, me and Katherine noted down a shopping list and were sent to Sainsbury's to get the cast and crew's lunch. I also helped with lighting by holding the reflector at certain times and to take the glide cam apart and put it away, when not required any more. 

I found it really fascinating to watch another group work, while not having too much stress on my shoulders (although to be honest I spent the time worrying about whether our film would run as smoothly etc). It's definitely given me some inspiration for our set  next week and I wish them all the luck with the rest of their film! 
I sculpted the potatoes in Sculptris in order to achieve more detail than Maya. I also find it easier to sculpt this way, rather than use the shapes in Maya. 


After messing around with styles - making the potato lumpy and not so spherical

The going back into Maya I went File > Import in order to bring them in to Maya. 


I followed the usual procedure in adding UV mapping and then added several different potato textures found from google, in order to make sure there was some variety was in the potatoes. No two potatoes are the same! 

Final Potato Models

Texture added

Today we held our first rehearsal with the female dancer, Emma, who I had been in contact with from the outset from posting the casting ads. This was mainly to get to know her a bit more and establish some movements that we might want for our dance piece. After I greeted her and brought her to the room, the day consisted of going over the idea with her in person so she could get more of a feel for the piece and showing her some other visual inspirations and art pieces we had found. We had prepared key words to give her, such as chaotic, scared and lost and allowed her to improvise from these. I found this really exciting because this was the first time we were beginning to see moves that may form part of our dance. It was really interesting to see how Emma portrayed our keywords and the entire day gave us a better knowledge of what the piece may look like and of the movements that would be achievable. I particularly liked movements where Emma's arms were outstretched and a lot of the floor movement, as I think this looked most visually interesting and I could imagine it being more floaty, which is what we want for our piece. Experimenting with rolls and tumbles also proved to be a good idea, as the movement fitted in well with the beginning of our film. 


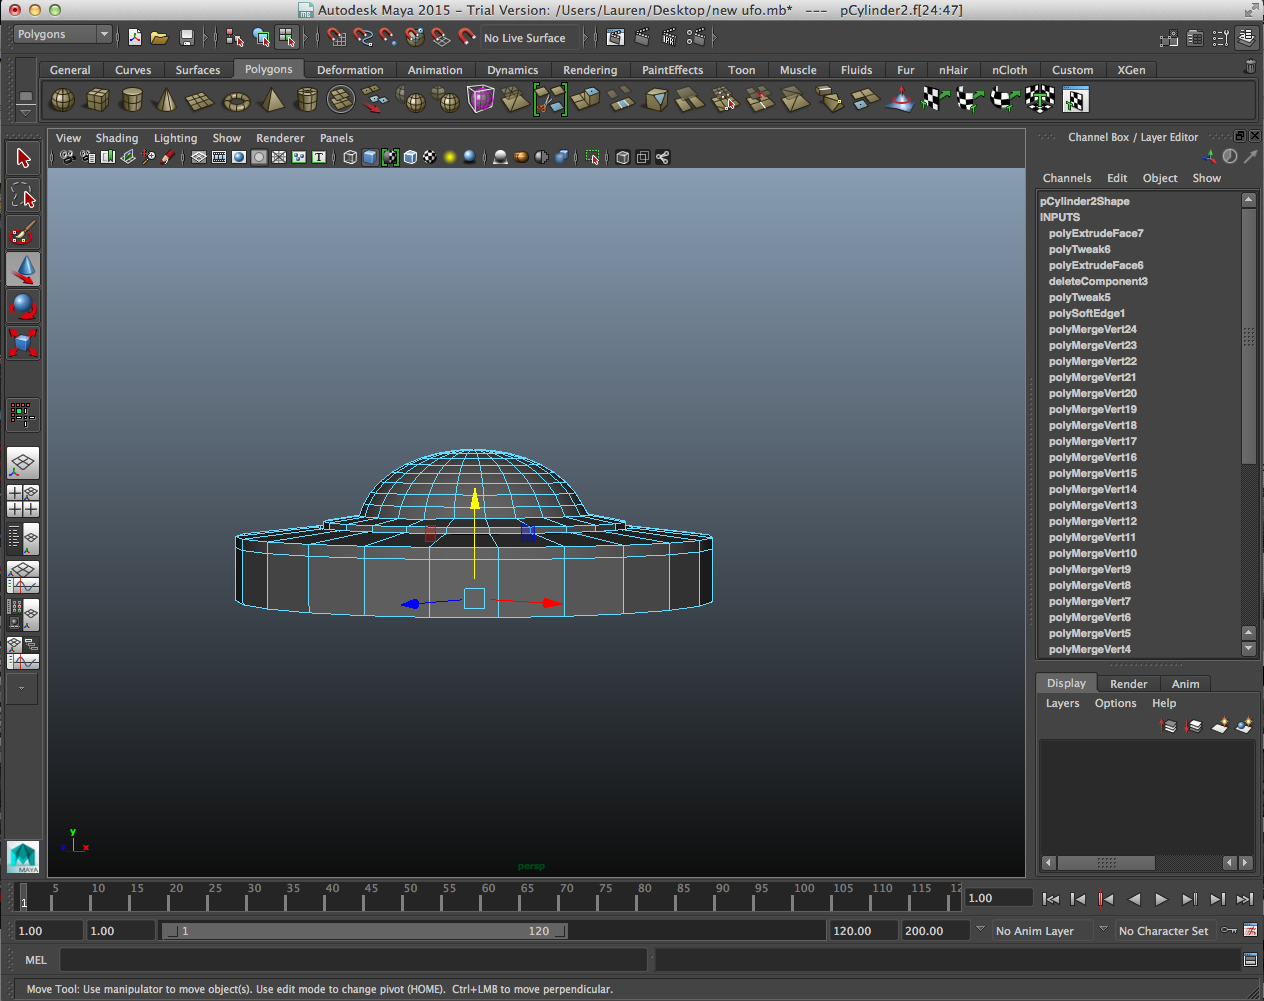
Continuing from my previous work on this model...Here is a reminder of what I made : 

Updated UFO Model

I created a UV Snapshot by going  Edit UVs > UV Snapshot. 


I then imported this into photoshop to design the UFO. I added a shiny blue texture for the window, a nebula texture for the main ship and a beam of light for the bottom. I also added a Toy Story alien as I felt the design and colours worked well in the movie's universe and it's style. 

Designing in Photoshop

Final texture 

I then applied this in Maya on to a file on a blinn. Here was the result: 


Final design


First of all I created a cylinder by going Create > Polygon Primitive > Cylinder


Initial cylinder

In the input section I changed the Subdivision Axis to 24. This created more areas for me to manipulate the cylinder. 


Cylinder with subdivisions

In face mode, I used the paint selection tool to select all the faces. 


Then using the extrude tool I moved it upwards and then brought everything in from the centre. 


Next I repeated the process using the shortcut 'G' to extrude, creating another ring from the centre and moving this up slightly as before. 


I repeated this stage again, creating an even smaller ring. 


Next I added a sphere, making sure it had 24 subdivisions - the same as the rest of the UFO.


I went into side view by holding space bar > Maya > right view. Then while in face mode I selected half the sphere and deleted it. 


I deleted the faces of the circle where I wanted to place the semi - circle by using the paint select tool, highlighting the faces and hitting backspace. In the top view I positioned the semi-sphere over this. 


I then made it bigger to fit the area using the scale tool. 


Back in perspective view, I selected both shapes together and then went Mesh > Combine to combine the two shapes. 


As you can see even though the objects are combined, the vertices are not. I went to vertex mode > merge vertex tool. I then clicked on the vertices' points on the sphere and alligned them with those on the rest of the ship, therefore merging them together. 

Pre-merged vertices 

Post - Merged vertex 

As the edges between the sphere were very soft and blended, I'd prefer a more distinct look between the two. 
Original softened look

To get the more distinct look, I went into edge mode and double clicked on the connecting edge to select the entire line. I then went Normals > Harden Edge. 


Entire edge selected


Hardened edge

Using the paint selection tool I selected the upper faces (the sphere and circle around it). I then used the move tool to move these upwards more


Next I highlighted the faces of the outer circle and using the extrude tool, moved it downwards. 


To begin on the bottom of the craft, I selected all faces again and then using the move tool, moved it upwards to make the base of the craft thinner.


Thinner base

With the faces still selected, I used the extrude tool and then using the move tool, moved it downwards. 


Then using the scale tool, I moved the base inwards, as shown below.


Next I went to Mesh Tools > Insert Edge loop tool and added an edge in the centre. 


Added edge loop

Highlighting the bottom faces and then using the extrude tool, I moved the bottom face upwards forming an indentation to wear a light beam could come out of.


Continuing on the bottom I highlighted every other face, extruded and then moved these inwards. Selecting the edges where the faces connect to the beam section, I used harden edge on them. 


This is the final UFO model. The next stage will be designing it in photoshop.